
How do you optimize NVIDIA Control Panel for gaming?
Optimize an NVIDIA Control Panel
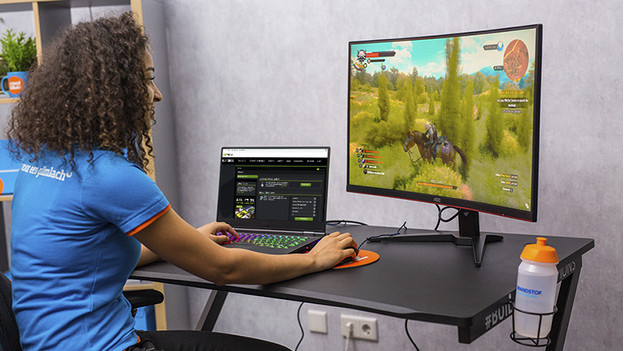
There are many ways to adjust the settings of your video card, like in your BIOS, with software from third parties, or in the settings of your game. The 'Control panel' is the most reliable, because this was designed by NVIDIA itself. Get yourself a cup of coffee and a 15 to 30-minute time slot to optimize your game PC with the following 9 steps:
- Update your driver.
- Optimize the resolution and refresh rate.
- Adjust the color settings.
- Go to 3D settings.
- Optimize sharpening and scaling.
- Optimize DSR and anisotropic filtering.
- Adjust anti-aliasing.
- Adjust the other 3D settings.
- Configure PhysX and close 'Control panel'
Step 1: update your drivers
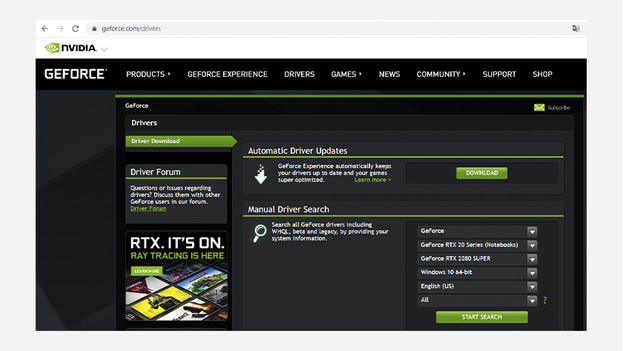
- First, update your drivers. To do this, go to 'Geforce.com/drivers' and click 'download' under 'Automatic Driver Updates'. Open the file when the download is ready and complete the installation.
- Reboot your PC when the installation is completed.
- Go to your desktop and right-click on it. Select 'NVIDIA Control Panel' to open the program.
Step 2: optimize the resolution and refresh rate
-
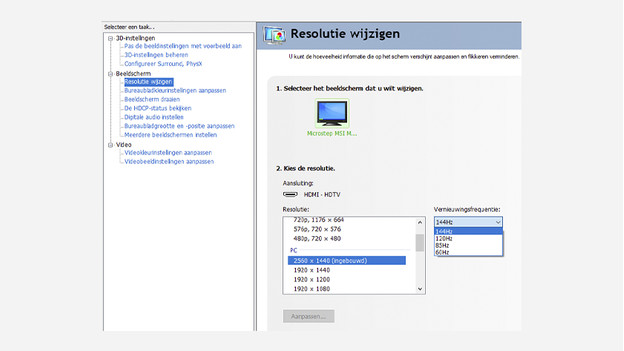
The most simple yet most important settings can be found under 'Display' at 'Change resolution'. Select the highest resolution (for example 2560x1440) and the highest refresh rate (for example 144Hz) for the sharpest and smoothest image during gaming. Do you have multiple monitors? Try to keep these settings the same.
-
You can set G-Sync and G-Sync Compatible via 'Display' -> 'Set up G-Sync'. G-Sync matches the number of frames of your video card to the refresh rate of your monitor.
Step 3: adjust the color settings
-
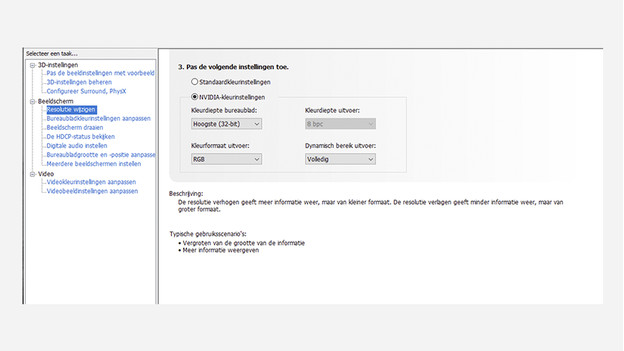
You can find the first color settings under 'Change resolution' at the bottom of the page. Check NVIDIA color settings and choose a color depth as high as possible. Select the option 'Full' at 'Output dynamic range'.
-
Now in the left menu, go to 'Adjust desktop color settings' and look for Digital Vibrance. Set this to somewhere between 60 and 80% for a colorful image. These color settings don't make your PC slower.
Step 4: go to 3D settings

Most settings are under '3D settings'. You can find this category at the left upper corner of the configuration screen.
- In the '3D settins' tab, go to 'Adjust image settings with preview' and select 'Use advanced 3D image settings'.
- Go to the second tab 'Manage 3D settins'.
Step 5: optimize sharpening and GPU scaling
-
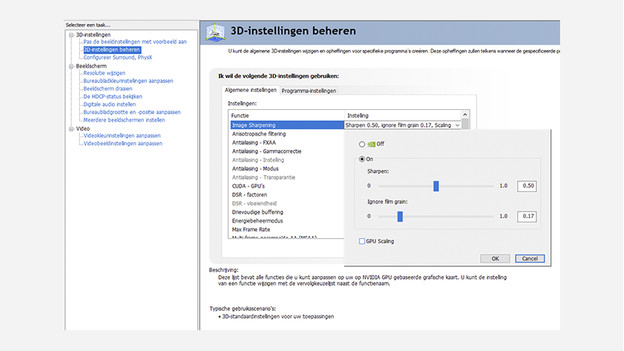
Turn on 'Image sharpening' to make the image sharper during gaming. Especially with lower resolutions, like 1080p, you can see a big difference and it isn't very demanding for your video card. Experiment a little with the 'Sharpen' and 'Ignore' movie grain options.
-
Check GPU scaling if you want to automatically scale low resolutions up to the resolution of your monitor. For example, if you want to game in Full HD on a QHD monitor. This is less demanding for your video card and provides more fps. In combination with 'Image sharpening', your image remains sharp.
Step 6: optimize DSR and anisotropic filtering
-
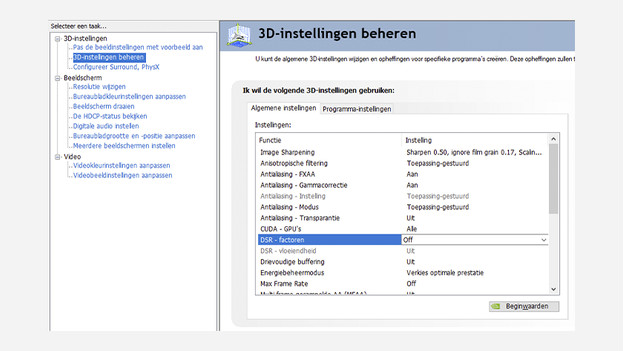
GPU scaling makes a lower resolution sharper, but DSR makes a higher resolution less sharp. That way, you can play 2160p games on a 1080p monitor. But DSR is very demanding for your GPU. So only turn on 'DSR - Factors' when you have a high-end video card and a monitor with a low resolution.
-
Anisotropic filtering (AF) provides more detail and sharper textures, especially when you look into the distance in-game. This isn't demanding for your video card. Set this to 'Application controlled', so you can set this per game. Is everything about the fps? Keep it off.
Step 7: adjust anti-aliasing
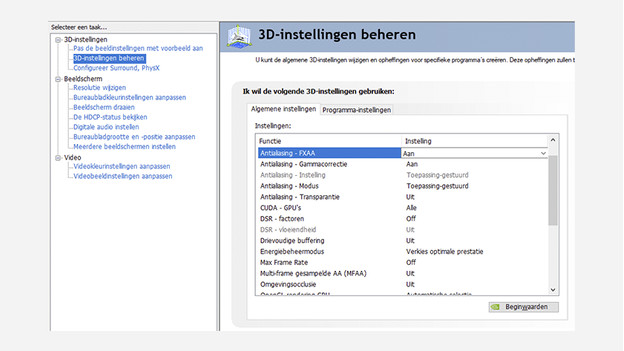
Anti-aliasing (AA) reduces the pixelated stairs effect you get with a slanted line. This is especially noticeable with low resolutions, because there are less pixels to fill the screen. That's why anti-aliasing is mostly suitable for screen resolutions like HD or Full HD. Two well-known settinsg are FXAA and MFAA. We recommend FXAA, because this barely puts a strain on your video card. If you prefer this, turn on 'Anti-aliasing - FXAA', but Multi-frame sampled AA (MFAA) off.
Step 8: adjust the other 3D settings
| Setting | Explanation |
|---|---|
| Anti-aliasing - Gamma correction | Turn off for a higher fps, but on for better color gradients. |
| Anti-aliasing - Mode | Select 'Application-controlled', so you can set this per game. |
| CUDA - GPU's | Set up your most powerful video card. |
| Triple buffering | Turn off when you use G-Sync, G-Sync compatible, or VSync. |
| Power management mode | For the lifespan of your video card, it's wise to set it to 'Optimal power'. Do you want more fps and smooth gameplay? Choose 'Prefer maximum performance'. |
| Max Frame Rate | Keep it off if you want as many fps as possible, but set a maximum if you want a smooth display. |
| Ambient Occlusion | Choose 'Performance' for a higher fps, but set it to 'Quality' for a realistic and even lighting for your games. |
| Monitor Technology | Choose for 'G-Sync' or 'G-Sync Compatible' if your monitor and video card support this. |
| OpenGL rendering GPU | Select your primary video card here. |
| Shader-cache | Turn on when you have enough space on your drive, this will reduce the CPU usage. |
| Texture filtering - Anisotropic preview optimization | This is demanding for your video card. To turn it on or off depends on your preference. |
| Texture filtering - Quality | Set to 'High speed' for competitive games like shooters and 'High quality' for adventure games, for example. |
| Texture filtering - Negative LOD-bias | Do you use AF? Turn this off. |
| Texture filtering - Trilinear optimization | Do you use AF? Turn this on. |
| Thread optimization | Choose 'Automatic' for the best CPU performance. |
| Vertical Synchronization (VSync) | This is only relevant if you don't have G-Sync or G-Sync Compatible hardware. It ensures a slightly smoother gameplay. |
| Virtual Reality previously rendered frames (pre-rendered frames) | Keep this on '1'. |
| Preference - Preferred refresh rate | Set 'Highest available'. |
| Low latency Mode | Only set this to 'On' or 'Ultra' if you have enough GPU power, so you can reduce your input lag. |
| Are you done? | Press 'Apply' at the bottom of the screen when you're happy. |
Step 9: configure PhysX and close the control panel
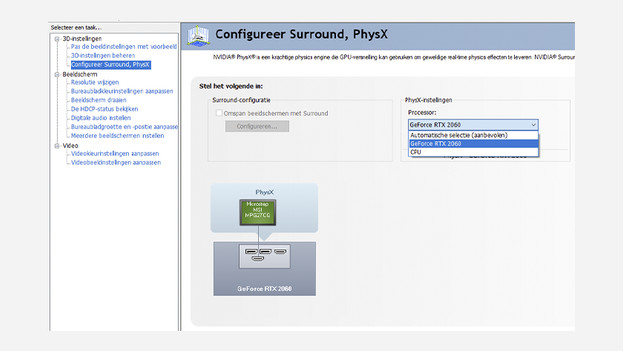
Lastly, go to the tab 'Configure Surround, PhysX' on the left side of the screen. Under PhysX-Settings, select your primary video card and click Apply. Check all your adjustments one last time and close the Control Panel when you're done. Reboot your PC and start a game to check your adjustments. Tip: doesn't your game run smoothly after you changed the settings? Put them back to the original settings and adjust them one by one.


