Written by Giorgos
Edited on
16 April 2025
·
13:33
How do you build a gaming PC from A to Z?
You've bought all your components and want to get started building your own gaming PC as soon as possible. In this article, we'll explain in 10 steps how to install each component in your gaming desktop.

Build a gaming PC in 10 steps
Follow the steps below to build your gaming PC. You'll find a link for an extra detailed explanation for the product type under each paragraph.
- Step 1. Make sure you're grounded.
- Step 2. Place the processor on the motherboard.
- Step 3. Click the RAM in the motherboard.
- Step 4. Place the motherboard in the case.
- Step 5. Install the processor cooler and fans.
- Step 6. Install the HDDs and SSDs.
- Step 7. Install the video card.
- Step 8, Connect the computer power supply unit.
- Step 9. Organize your cables.
- Step 10. Boot up your gaming PC.

Step 1: make sure you're grounded
A static shock can have a big impact on your computer components. No matter how small it is, there's a chance that your components will be damaged. That's why you should wear an antistatic wrist strap. Attach the clip to a grounded object such as your radiator and get to work safely. No wrist strap available? Rub your hands on the radiator regularly to discharge yourself from static electricity.

Step 2: install the processor on the motherboard
It's useful to install most of the components outside of the case. This includes the processor as well. You place this on the socket of the motherboard. Open the cover of the motherboard and place the processor on the socket with the arrow at the top right. If you don't do this, the connectors on the processor will bend. Loosely place the processor on the socket and close the lever on the motherboard. Your CPU is now properly installed.

Step 3: click the RAM into the motherboard
It's time to install the RAM after the processor. The memory slot needs to match the pins of the RAM module. That means there's only 1 way to install your RAM. Click the RAM into the slot by pushing it down. When the switch clicks up, you know the RAM is installed properly. Do you have more than 1 slot? Check the manual of your motherboard which slots you need to fill first.

Step 4: place the motherboard in the case
Now that the smaller components are on the motherboard, it's time to install the motherboard in the case. The most important thing is to keep the connectors on the left side, so they line up with the cutout in your case. Also make sure the screw holes match those of the computer case. Then secure the motherboard and you're done. Do you have an air cooler? Install it before installing the motherboard.
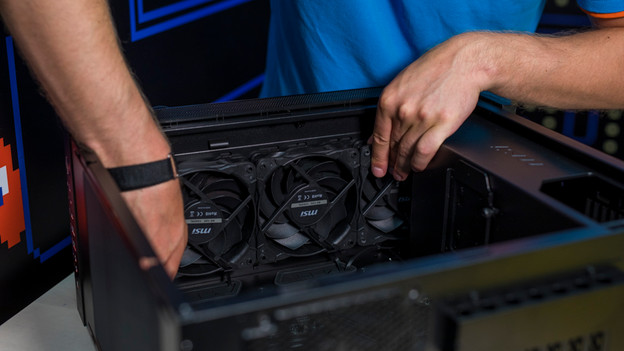
Step 5: install the processor cooler and fans
Whether you have an air cooler or water cooler, a processor cooler ensures better heat dissipation around your CPU. Before you install this cooler, put a drop of thermal paste on the CPU. This ensures a better connection between the cooler and the processor. An air cooler is easier to install than a water cooler. An air cooler is a matter of clicking it into place, but a water cooler involves more than you think.

Step 6: install the HDDs and SSDs
Use a free mount on the side for HDDs. Connect the power cable and SATA cable to the drive before placing it in the mount. This makes maneuvering it easier. There are 3 different kinds of mounts for SSD. You screw a 2.5-inch SSD and SATA SSD in a free connector. Do you have an M.2 SSD? Slide this into the slot on your motherboard. Do keep in mind what key you have on your motherboard. This determines what kind of M.2 SSD you need.
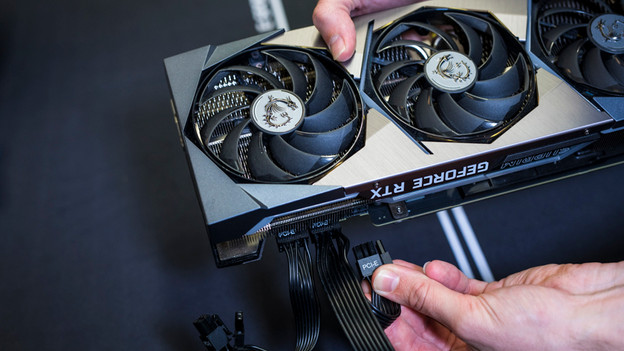
Step 7: install a video card
It's time for the graphic splendor of the gaming PC, the video card. First, unscrew the PCIe bracket on the back of the case. Afterwards, you can easily click the video card on the motherboard. Make sure you choose the most powerful slot on the motherboard for the best performance. Then screw the PCIe bracket back on the case, so your video card stays firmly in place.

Step 8: connect the computer power supply unit
Slide and click the power supply into place at the bottom of the computer case. Be sure to place the opening for the power supply toward the back. Then screw the power supply in place and guide all power cables to it. Start with the connector for the motherboard. This is the most important. Then press all power cords into the PSU tightly to make sure they're properly connected. A loose cable poses a short circuit risk.

Step 9: organize your cables
Now that all the different components are installed in your case, it's time to organize the cables for a clear overview. Of course, you want to know which cable belongs to which component. Bind the cables of your storage together and do the same for the cables of your processor cooler. This way, you always have a clear overview when you want to replace a component.
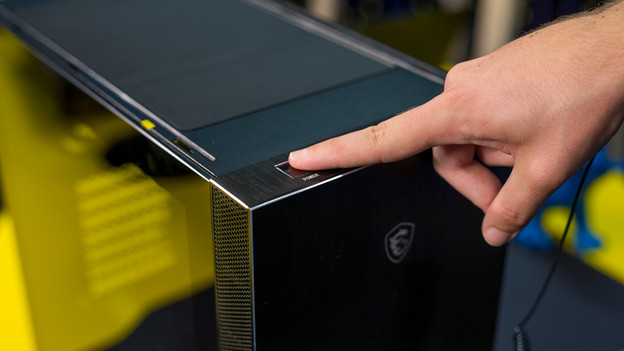
Step 10: boot your gaming PC
Congratulations! You've built your own gaming PC and you're ready for some online gaming. Boot your computer as usual and get started with the remaining setup. Have fun with your self-built gaming PC.
Article by Giorgos
Components Expert.